A size guide in the Flatsome theme is important if you have an online clothing store. The size guide helps your customers find clothes that fit them best according to their measurements. That’s why it’s good practice to know how to create a size guide for your product page that will help customers choose the right size of clothes and it is the best popup plugin in WordPress.
In this tutorial, we will see how we can add a ‘Size Guide’ to the Flatsome theme. When customers click this size guide button, a size guide will pop up in the lightbox. We will implement the size guide in the Flatsome theme using a demo code that you can edit and set measurements as you prefer.
How to Create a Size Guide in Flatsome Theme Step-By-Step
Step 1:
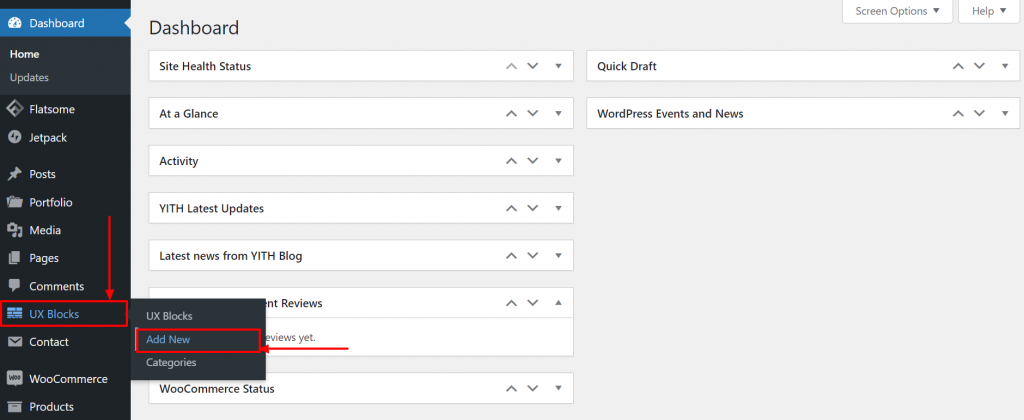
First, we need to create a UX Block. In the dashboard, hover on the ‘UX Blocks’ option and click on ‘Add New.’
Step 2:
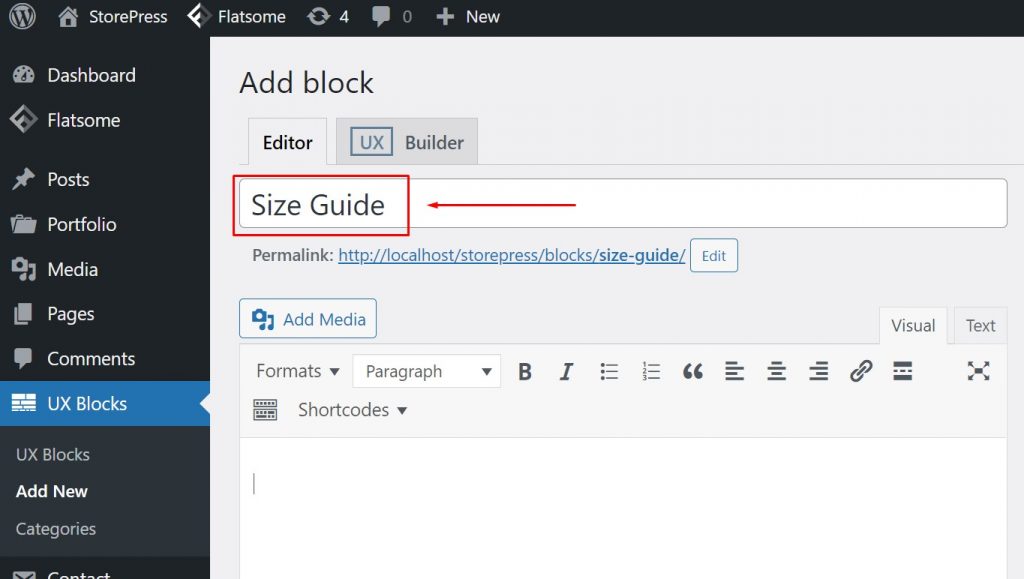
Give the block the title ‘Size Guide’ so that the shortcode will be [block id=”size-guide”]
Step 3:
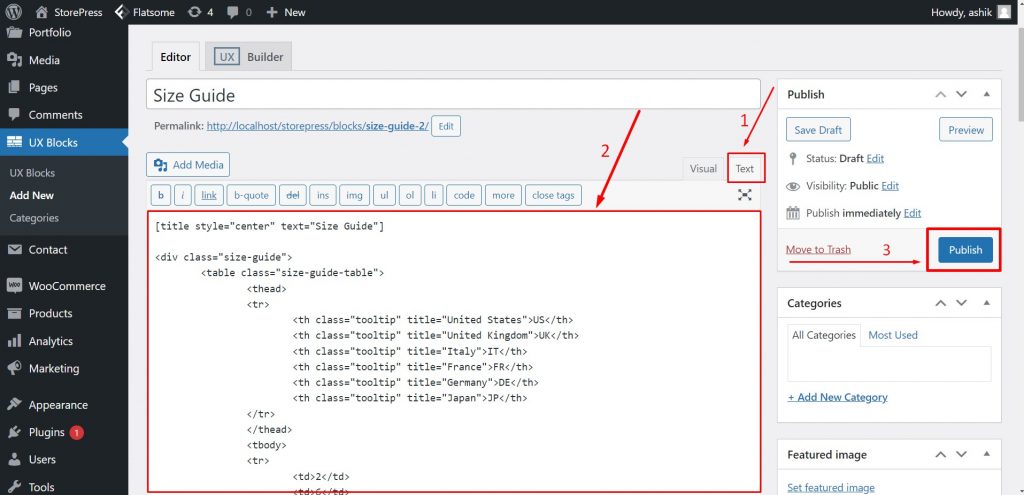
Click on the ‘Text’ tab in the editor to select it. Copy and paste the given code to the editor. You can customize the values as per your need. Now click on ‘Publish’ to finish creating the UX Block. The default text editor same in all the best WooCommerce themes.
[gap]

[title style="center" text="Size Guide"]

<div class="size-guide">
<table class="size-guide-table">
<thead>
<tr>

     <th class="tooltip" title="United States">US</th>
     <th class="tooltip" title="United Kingdom">UK</th>
     <th class="tooltip" title="Italy">IT</th>
     <th class="tooltip" title="France">FR</th>
     <th class="tooltip" title="Germany">DE</th>
     <th class="tooltip" title="Japan">JP</th>

</tr>
</thead>

<tbody>

<tr>

<td>2</td>
<td>6</td>
<td>38</td>
<td>34</td>
<td>32</td>
<td>7</td>

</tr>

<tr>

<td>4</td>
<td>8</td>
<td>40</td>
<td>36</td>
<td>34</td>
<td>9</td>

</tr>

<tr>

<td>6</td>
<td>10</td>
<td>42</td>
<td>38</td>
<td>36</td>
<td>11</td>

</tr>

<tr>

<td>8</td>
<td>12</td>
<td>44</td>
<td>40</td>
<td>38</td>
<td>13</td>

</tr>

<tr>

<td>10</td>
<td>14</td>
<td>46</td>
<td>42</td>
<td>40</td>
<td>15</td>

</tr>

<tr>

<td>12</td>
<td>16</td>
<td>48</td>
<td>44</td>
<td>42</td>
<td>17</td>

</tr>

<tr>

<td>14</td>
<td>18</td>
<td>50</td>
<td>46</td>
<td>44</td>
<td>19</td>

</tr>

<tr>

<td>16</td>
<td>20</td>
<td>52</td>
<td>48</td>
<td>46</td>
<td>21</td>

</tr>

<tr>

<td>18</td>
<td>22</td>
<td>54</td>
<td>50</td>
<td>48</td>
<td>23</td>

</tr>

<tr>

<td>20</td>
<td>24</td>
<td>56</td>
<td>52</td>
<td>50</td>
<td>25</td>

</tr>

<tr>

<td>22</td>
<td>26</td>
<td>58</td>
<td>54</td>
<td>52</td>
<td>27</td>

</tr>

<tr>

<td>24</td>
<td>28</td>
<td>60</td>
<td>56</td>
<td>54</td>
<td>29</td>

</tr>

</tbody>

</table><!-- /.size-guide-table -->

</div><!-- /.size-guide -->

[gap]

<p style="text-align: center;">

<small>This is a size guide demo (sizes may be incorrect).</small>

</p>
Step 4:
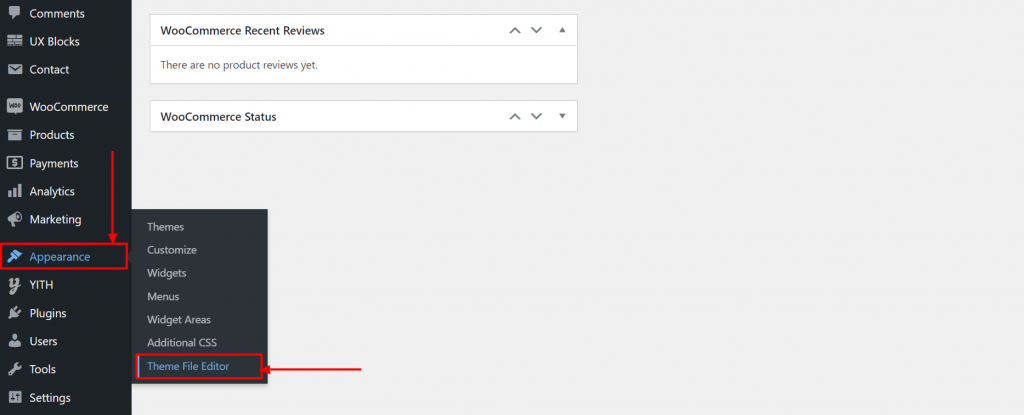
In the dashboard, hover on the ‘Appearance’ and click on ‘Theme File Editor.’
Step 5:
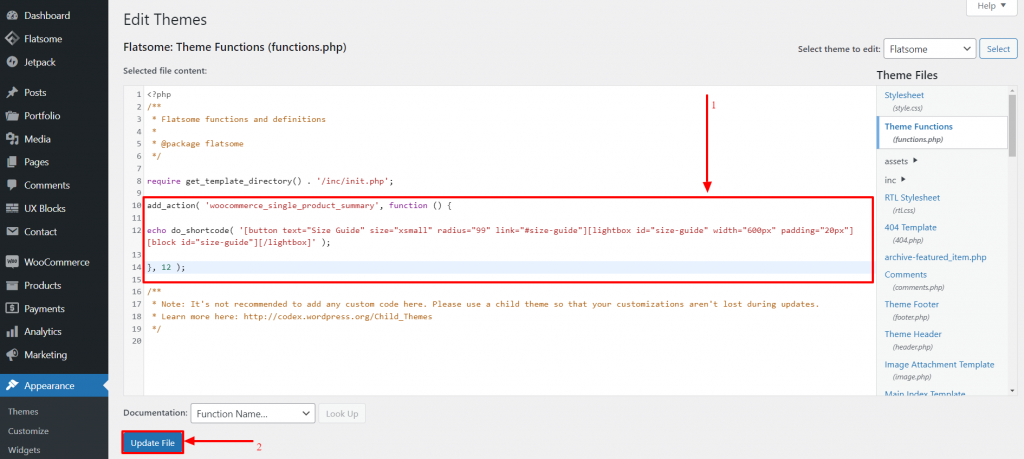
Inside the ‘Theme File Editor,’ click on ‘Theme Functions’(functions. php) to open it.
Step 6:
Now paste the code given below in the ‘Theme Functions’ (functions.php) file. Then click on ‘Update File’ to save the customization.
Note that, we strongly recommend you to use a child theme for making changes in your theme files. Make sure you have a backup of your website before making any changes inside the theme files.
Paste this code inside the ‘Theme Functions’ as shown in the image.
********************************************************************************************
add_action( 'woocommerce_single_product_summary', function () {

echo do_shortcode( '[button text="Size Guide" size="xsmall" radius="99" link="#size-guide"][lightbox id="size-guide" width="600px" padding="20px"][block id="size-guide"][/lightbox]' );

}, 12 );
********************************************************************************************
Step 7:
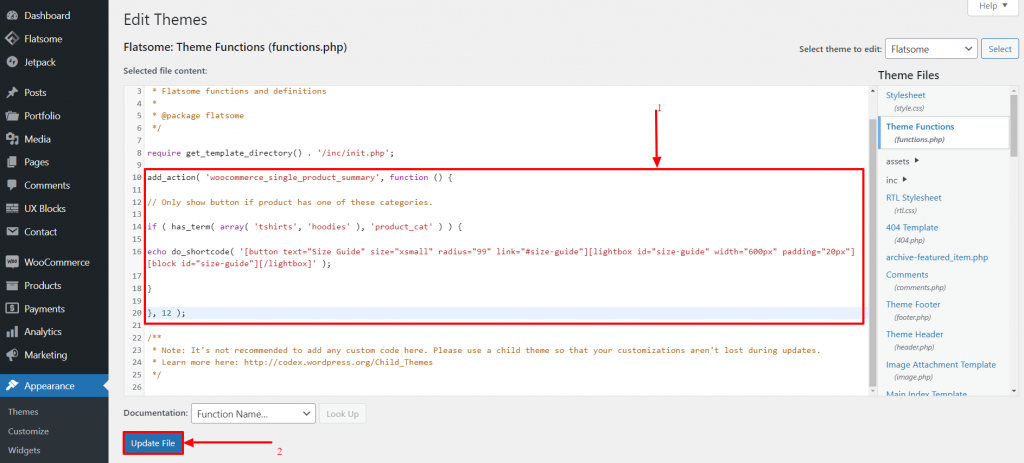
Alternatively, you can choose to show the Size Guide button only for products of specific categories. In that case, paste the code given below instead of the previous one inside the ‘Theme Functions’(functions.php) file.
******************************************************************************************************
add_action( 'woocommerce_single_product_summary', function () {

// Only show button if product has one of these categories.

if ( has_term( array( 'tshirts', 'hoodies' ), 'product_cat' ) ) {

echo do_shortcode( '[button text="Size Guide" size="xsmall" radius="99" link="#size-guide"][lightbox id="size-guide" width="600px" padding="20px"][block id="size-guide"][/lightbox]' );

}

}, 12 );
******************************************************************************************************
Step 8:
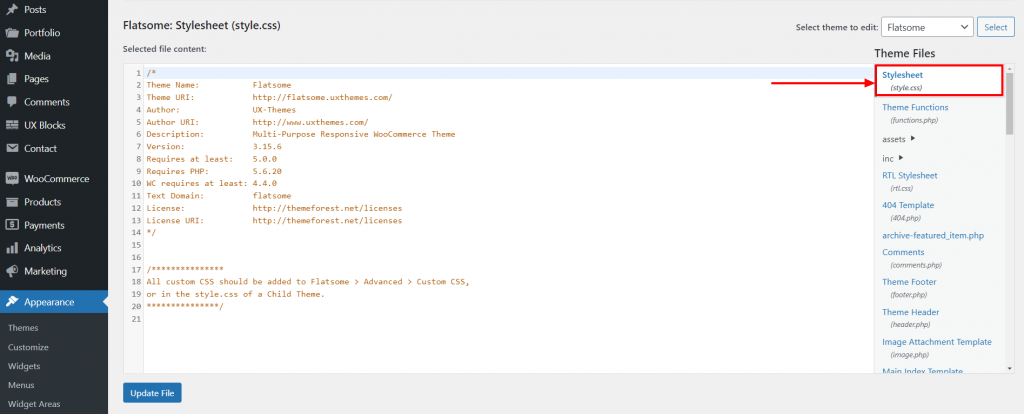
Inside the ‘Theme File Editor’ we are working on, click on ‘Stylesheet’(style.css) to open the file in the editor. Most popular free WordPress WooCommerce themes can be edited using the theme file editor.
Step 9:
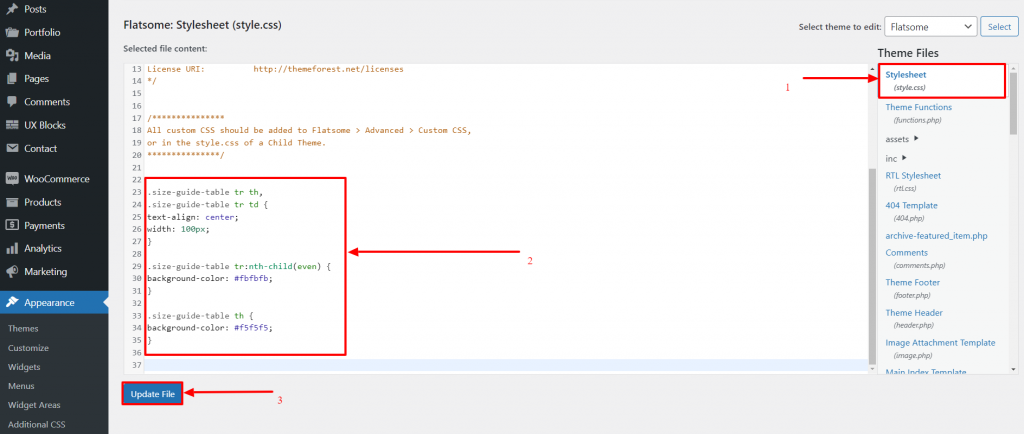
Paste the given code below inside the ‘Stylesheet’(style.css) file. Then click on ‘Update File’ to save the customization.
******************************************************************************************************************************
.size-guide-table tr th,
.size-guide-table tr td {
text-align: center;
width: 100px;
}

.size-guide-table tr:nth-child(even) {
background-color: #fbfbfb;
}

.size-guide-table th {
background-color: #f5f5f5;
}
*******************************************************************************************************************************
Step 10:
Now open any product and you will find the ‘Size Guide’ button we created just below the price. Click on the ‘Size Guide’ button.

Step 11:
As you clicked the ‘Size Guide’ button, the size guide, you’ll get pop up in the lightbox. We can see our ‘Size Guide’ is working perfectly.
Conclusion
In the above-mentioned steps, we have covered how you can easily create a ‘Size Guide’ button that will open a size guide in the lightbox for your customers. This size guide will ensure your customers can choose their perfect clothes and keep them more engaged in your online store.
We hope this tutorial has been helpful to you. Follow us for more awesome tutorials like this! Feel free to check out our tutorial on how to add menu labels in the Flatsome theme.


